
Lanterns impart a soft, gentle glow to any room. I love using lanterns at home, especially while I’m reading, working or having dinner with my family.
Lanterns come in many different forms, but my favorites are glass votives. Glass votives are jar-like containers that serve as candle holders, and may be made from plain or decorated glass.
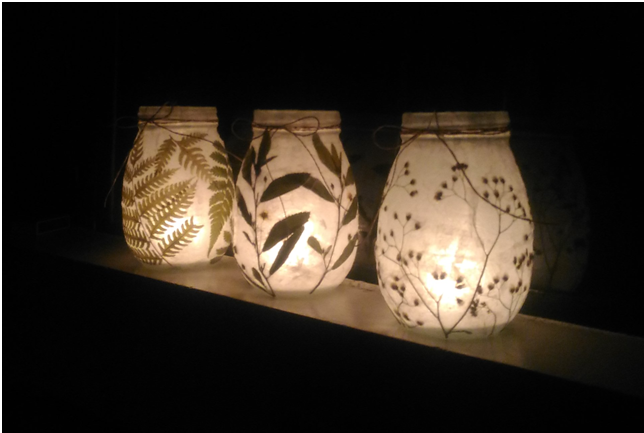
Votives are incredibly easy to make. I made my own glass lanterns using old jars and just a little bit of patience. I decorated them using dried plants and weeds from the garden because I love the delicate shadows that they cast against the walls.
This is a great project for those who love recycling old jars. I used Lady’s Choice Mayonnaise jars for this project because of their round shape, but any large jar would do. I recommend that you do not use smaller jars unless you will be using an artificial light source, as small jars can get very hot and crack if you place candles inside of them.
Want to try it for yourself? Here is how you can make your own DIY jar lanterns at home. The result is a beautiful, frosted glass lantern perfect for any coffee table or shelf. They’re also a great gift for the botanist or green-thumbed friend in your life.
What You’ll Need:
- Pressed plants or flowers
- Large jars
- White glue
- Plain white crepe paper
- Small, flat paintbrush
- Water
- Twine or ribbon (optional)
- Gold paint (optional)
Step 1: Choosing your plants
The first step in making your jar lantern is to prepare the plants that you will be using to decorate it.While you can use pretty much any plant that you desire, I find that using plants with soft stems and leaves produce the best effect.
Tough plants with thick, robust leaves tend to not stick well against curved surfaces and are also brittle once dry. They also allow very little light to pass through, which defeats their purpose as a lantern. Plants with very large leaves or blooms will also not work, as they obstruct the light.
Instead, stick to herb-like plants and weeds. Here are some of the plants that I used, from left to right (please note that I am not a botanist, so some of these may be misnamed):

Step 2: Pressing your plants
After choosing your plants, make sure to pat them dry before you start pressing them. There should be no rain or dew droplets on them.
Place them between the pages of any large book, making sure to add a piece of newspaper between them to protect the book’s pages from any oozing plant juices. I used my old college yearbook because it is the heaviest, thickest book that I own.
It will take about two to three weeks to completely press and dry your plants. I let them sit for at least four weeks, however, because it was a humid month and the plants didn’t dry as quickly as I would like.
Always press more plants than you require, because some of them may not turn out as nice as you would like. After several weeks, your pressed plants should be completely dry and flat, but still flexible enough to work with.
Step 3: Adding the first layer of paper
Once your plants have completely dried, it’s time to add the first layer of paper to your lanterns. Take your white crepe paper and tear them into approximately 3×3 cm squares. Do not use scissors for this part, because the sharp lines tend to show through the lantern once you glue them down. By creating feathered, frayed edges, you create a soft, frosted effect on the glass, and the lines are less likely to show through. Make enough to cover your jars.
Mix two parts of white glue with one parts water, and apply them evenly to the jar using your paintbrush. Start sticking your pieces of paper on the jar’s surface, pressing them down with the brush until they are soaked through, but not dripping.

Make sure to cover the whole jar while only overlapping the very edges of the pieces of paper. If the paper is too thick, it will affect your lantern’s brightness.
Step 4: Adding your pressed plants
Take your pressed plants and start cutting them to size, arranging them in the jar as you prefer. Do this while the first layer of paper is still wet – the plants should easily stick onto the surface. Leave bits of negative spaces between the leaves to let the light show through.
Step 5: Adding the second layer of paper
After you glue down your plants, repeat step 3 and add a second layer of paper to your lantern, making sure to completely cover the first layer and the pressed plants.
Use the paintbrush to press down your paper, especially in areas where it will cover the plants. Try to apply them as flat as possible, making sure not to leave any gaps or bubbles.
You only need one thin layer. Let everything dry overnight.

Step 6: Final touches

Once your lanterns are dry, they are ready to use. As a final touch, I tied brown twine along the rims and added a touch of gold along the opening just to make it look neater. Add tea light candles to the bottom of the lanterns, and you are good to go. Happy crafting!